Behind the scenes

For a while now I've wanted to put together some BTS (behind the scenes) posts from some of my previous shots.  The main problem being that I think of doing it AFTER the fact and I don't have any behind the scenes photos or videos to show.  However in this case, I was able to drum up some shots that would work.
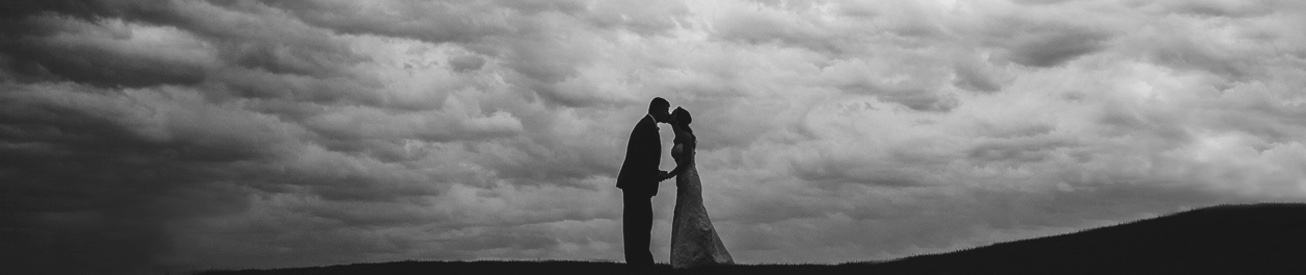
So lets start with the finished product and dissect it from there.  This one comes from my last wedding of 2014 - Trevor and Hannah.


I've had a lot of people who are just starting out with off camera lighting ask me how I learned to do it, and the truth is - trial and error!  I am basically self taught, I see something and think "how was that done"?  It could be as simple as a picture in a magazine, or something I see online or as complex as full set lighting in a movie.  I'm constantly wondering "how was that done"?  I try to break it down and recreate it, knowing that I will probably use at least part of what I learn somewhere down the line.  I don't want to just copy what I see verbatim, I want to understand how it was created so that I can put the pieces together with another project. 
The picture above was lit with ONE flash, in a softbox, with a grid on it.  How is that possible?  We had to light them individually and then add them to the final image - so it's actually 6 pictures laid on top of each other. 
Why?  Because I wanted to see if I could do it, and it was the only way of attaining this type of lighting.  I've shot in this exact location numerous times, but never used this technique.  Partly because it takes longer and at a wedding, extra time is something we just don't get.  But in this case it was FREEZING cold outside so we had some extra time to play with.  I like using a softbox with a grid because it doesn't spill light everywhere, it's very controlled, you get more texture and mood with it I think. 
For this to work I had to light each person individually and then layer them into the picture - sort of like making a cartoon in the "olden days" with onion skin paper (Google it if you don't know what I'm talking about)
This is a relatively narrow hallway with bright windows on either side, so I had to adjust my camera settings to eliminate the ambient light (max shutter speed of 250 with a flash, f14 or so and iso 100 - I'm just going from memory here, basically whatever got the room dark on my test shots).  Then we added the softbox and adjusted the flash output until I liked the result - no light meter garbage, just trial and error.
Here is a shot of the groom with the light level I was after.  The nice part about this technique is that only the person who is getting lit needs to be "in character".  I can see on the camera screen if it works or not, eyes open, etc and then off to the next one.  In this case we went from camera right to left, keeping everyone in position, but not worrying about them cracking jokes if it wasn't their turn.
Then we bring the 6 images into Photoshop and simply erase the part of the layer that we don't want visible on each image until we end up with the final product.  Here I have 3 in, and if you zoom in you can see part of Trevor's body missing since that part has been erased and he will be lit on the next layer.

This part probably sounds more confusing than it is.  Picture 6 pieces of paper, you cut one 2 inches thick, the rest is garbage, the other 4, then 6, 8, 10. The sheet that isn't cut is on the bottom, the 10 inch one is next, then 8 and so on.  Each time you line up the left edge.  When you layer them all together only an inch or two of each one is showing so it doesn't matter what's on the rest of the paper. When you flatten the image above, you'll have 4 different shades of color.  You could have a big red circle in the middle of the bottom one and it doesn't matter, you won't see it.
Then I crop it in tighter and finish with just a bit of burning (darkening) on some of the background elements.
The key to getting this to work is to make sure the camera doesn't move!  In this case I had it set up on a tripod right up against the wall.  The one thing that might help in the future is to get an empty shot for the background at the exposure setting that I want to use.  That way I have a total blank to work off in case I need it.
What a stunning drawing!  That's why I prefer pictures.
Hopefully at least one person found this informative, if you have any questions for me or would like to see something specific, please drop me a message on Facebook or send me an email.


Ms D's senior pictures in Minneapolis

Had a wonderful time with this young lady in Minneapolis this summer.


Matt & Andrea Winter Wedding in Minnesota

Matt and Andrea tied the knot back in January, on what felt like the coldest day of the century.  But they did manage to get in a few outdoor pictures before the sun went down (on a very windy, frozen lake in Plymouth).  A great couple to work with, such a fun wedding overall.

winter, wedding, mn, plymouth
wedding party, bar, toast,

Winter Wedding - Stonebrooke, Shakopee, MN

Although I just wrapped up my last wedding of 2014, I'm just now getting around to posting my last wedding of 2013!
Katie & Joe were married at Stonebrooke on an unseasonably COLD December day.  The outdoor pictures that you see here where done in short 4 minute bursts followed by a quick warm up session.
It sure was pretty though!

red, wedding, shoes, bride
winter, wedding, bride
winter, wedding, mn, shakopee